
Table of contents
2 – Phase one: preparation
3 – Phase two: development
4 – Phase three: production and delivery
5 – Where the process goes wrong
6 – Running the whole process with one partner
7 – Frequently asked questions
TL;DR — The clothing manufacturing process runs in stages: sourcing fabric, making the pattern and grading the sizes, building a prototype, developing samples across sizes and colours, producing the run, and checking quality before it ships. Each stage feeds the next, so a shortcut early on shows up as a defect later. A first prototype takes two to five weeks, samples about fifteen days once fabric arrives, and production three to six weeks, though ordering materials can add several weeks before any of it starts.
Most brands picture manufacturing as one step: you send a design, a factory makes it, the goods arrive. The reality is a chain of stages, each depending on the one before, and most of the delays and costs that surprise brands come from not seeing the whole chain.
That gap is where this guide comes in. It walks the full clothing manufacturing process from fabric to finished garment, stage by stage, so you can see what happens, how long it takes, and what it costs at each point. And for every stage, there’s a dedicated guide that goes deeper.
Here’s the mindset that makes the process manageable, from a brand owner at the start of theirs:
“I’m open to your suggestions. My goal is not for this process to be difficult. I know there are steps I don’t fully understand yet, and I’d rather do them properly than rush and pay for it later. So tell me what you need from me at each stage, and I’ll get it to you. I just want to end up with a product I’m proud of.”
That’s the right instinct. The process isn’t difficult once you can see it whole, and understanding the sequence is what lets you plan it rather than react to it. If you’re looking for a clothing manufacturer to run this process with, that’s the end goal. This guide is the map of what that process involves.
The clothing manufacturing process at a glance
Before the detail, here is the whole path in order. Every stage produces something the next stage needs, which is why the sequence matters as much as the steps.
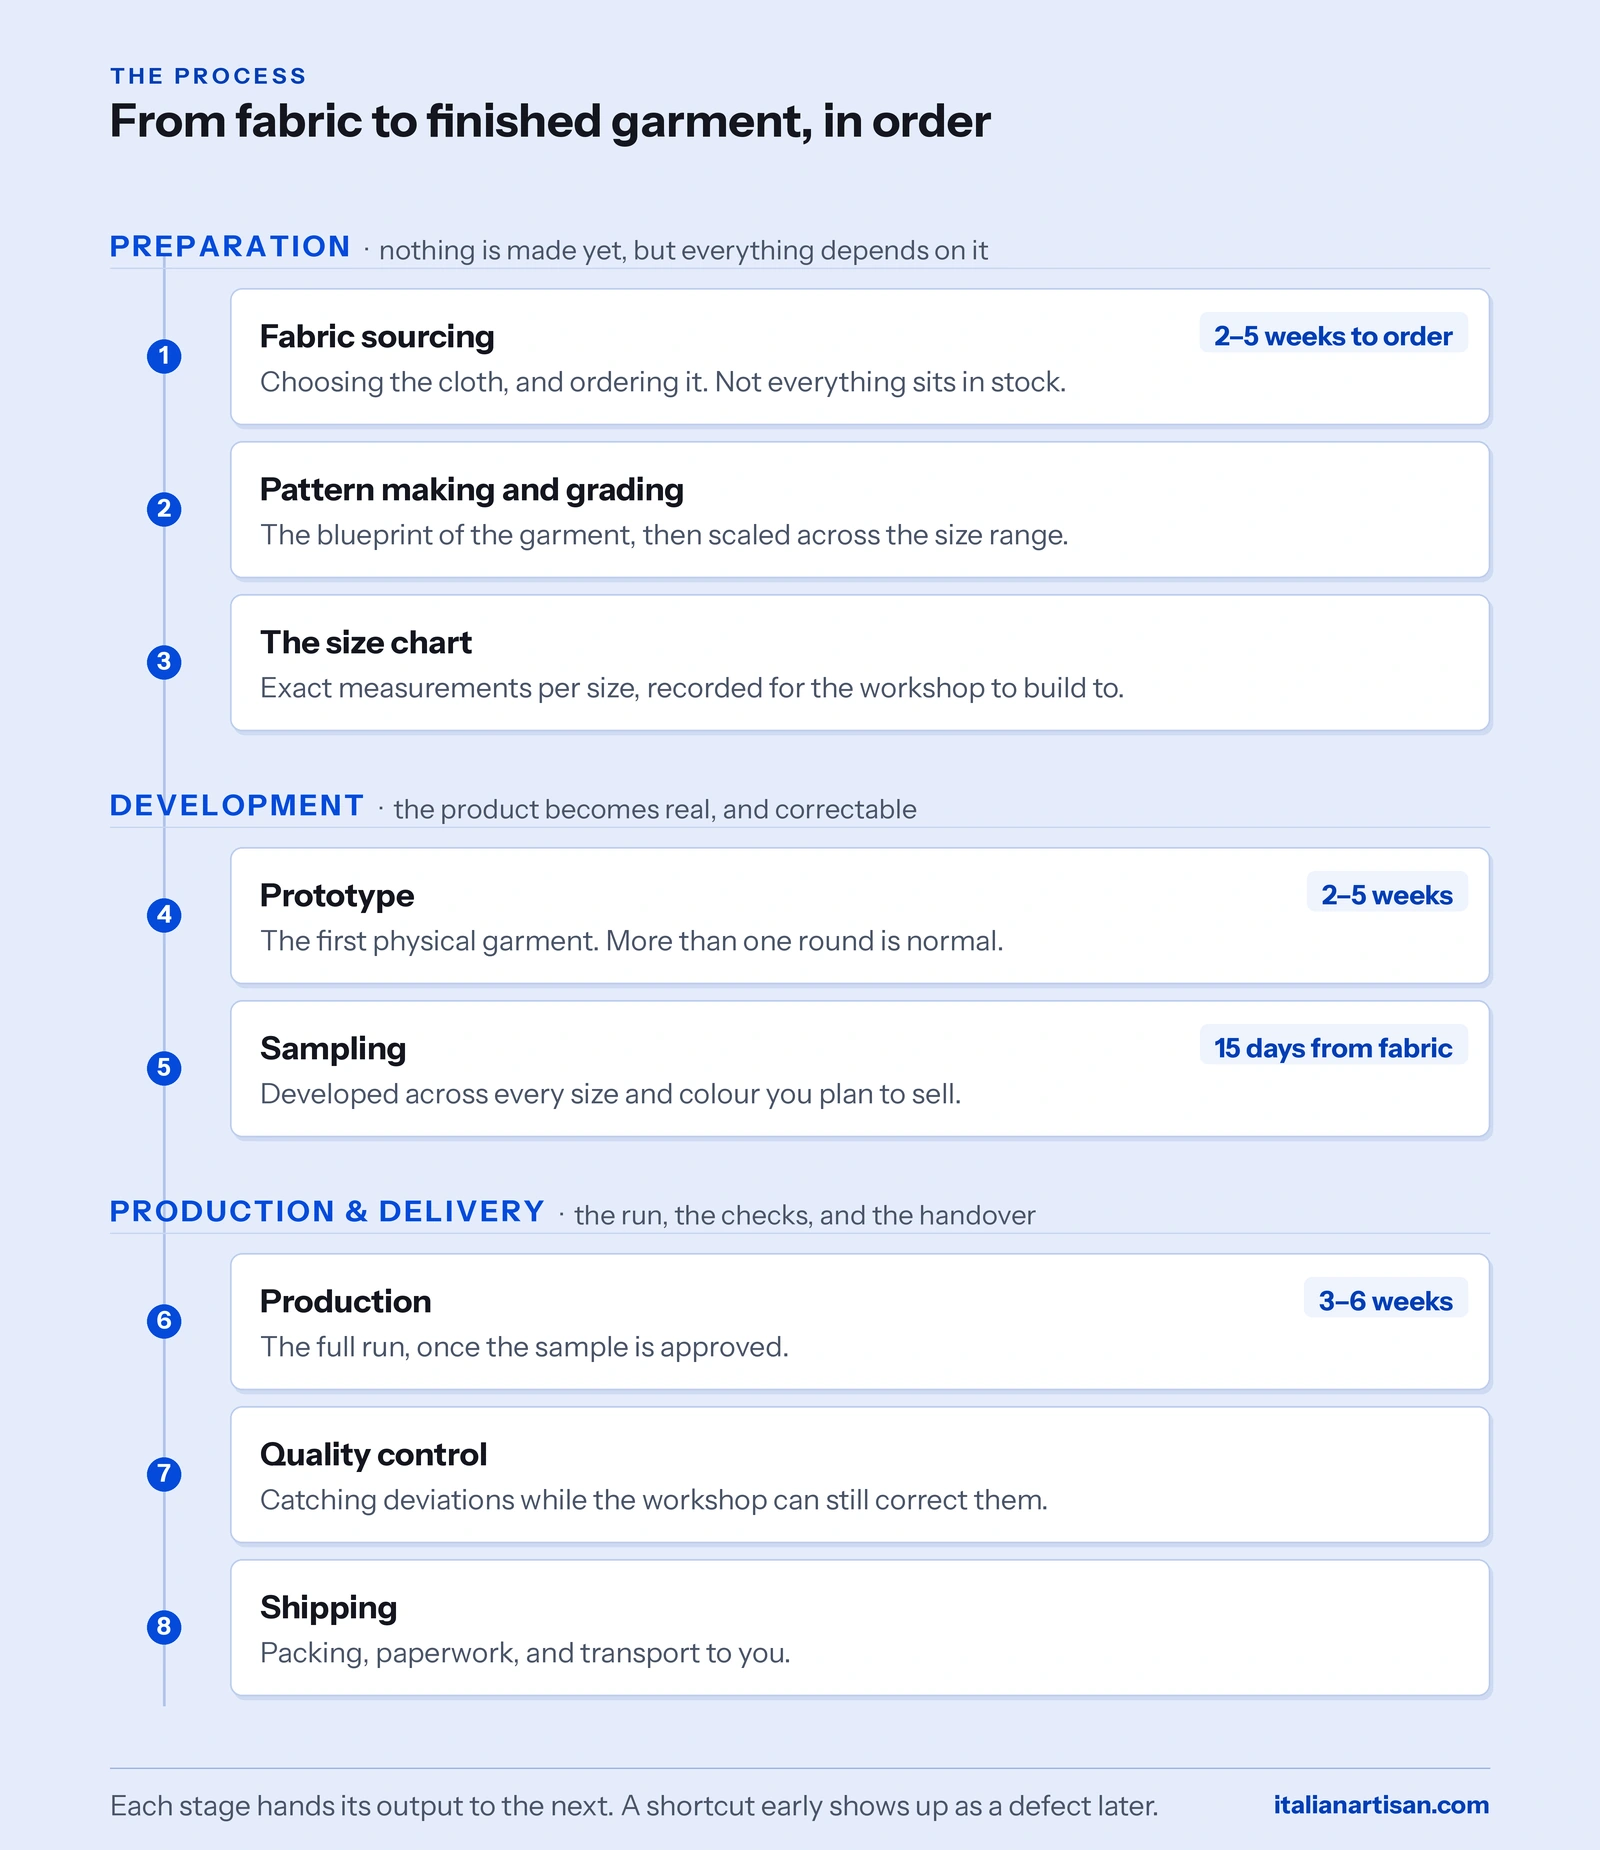
The stages fall into three broad phases.
- Preparation: sourcing the fabric, making the pattern, and grading the sizes. Nothing is made yet, but every later stage depends on getting this right.
- Development: the prototype, then samples across every size and colour. This is where the product becomes real, and where you catch problems while they are still cheap to fix.
- Production and delivery: the full run, quality control, and shipping. The stage most people think of as “manufacturing,” and the shortest to describe once everything before it is right.
The rest of this guide takes each stage in turn, with the real timelines and costs attached, and a link to the in-depth guide for each one.
Phase one: preparation
No one cuts or sews anything in this phase. But it decides almost everything that follows, because the fabric, the pattern, and the size system carry every later stage. Get these right and the rest has a chance. Get them wrong and no amount of skilled sewing will save the garment.
Fabric sourcing
Everything starts with the cloth. Fabric determines how a garment hangs, how it wears, what it costs, and often how long the whole project takes, so it’s the first real decision rather than an afterthought.
The choice runs deeper than “cotton” or “wool.” Weight, weave, finish, and composition all change the result, and the same garment in two different fabrics is effectively two different products. Whether you supply the fabric yourself or the workshop sources it for you is one of the defining questions of your production, and it shapes both your cost and your workload.
Fabric is also where the hidden timeline lives. Not everything sits in stock, and ordering a specific cloth or trim from a mill can take weeks before anything else can begin, a point we’ll return to when we reach timelines.
Our full guide covers this in depth: fabric sourcing for clothing brands.
Pattern making and size grading
The pattern is the blueprint of the garment: the set of shapes that, cut from fabric and assembled, become the product. It’s where a design stops being a drawing and becomes something buildable.
Grading is the step that comes with it. A pattern is made in one base size, then graded up and down to produce the full size range, and doing that well is a technical craft in its own right. A poorly graded pattern is one of the most common reasons a garment fits on the sample and fails across a size run.
See the full guide: pattern making and size grading.
Building the size chart
Grading produces a size range. The size chart is the document that records it: the exact measurements for every size, in a form the workshop can build to and you can check against.
It’s easy to treat as an afterthought, and expensive to get wrong. A vague or borrowed size chart is how a brand ends up with garments that are technically well made but don’t fit the customers they target. It belongs in your tech pack, and it’s worth building properly.
Read more: how to build a grading size chart.
Phase two: development
This is where the product stops being a plan and becomes a physical thing you can hold, wear, and correct. It’s the most important phase to get right, and the one brands are most tempted to rush. Our production manager is blunt about why that’s a mistake.
The prototype
The prototype is the first physical version of your garment. Its job isn’t to be perfect. Its job is to make the product real enough that you can see what works, what doesn’t, and what only becomes obvious once the thing exists.
“I strongly advise against skipping stages. The prototype exists to actually build the product, and the biggest misconception, especially among first-timers, is that one prototype should come back perfect. It’s in everyone’s interest that it does, but it rarely happens. Some things you only discover by making the garment, the fit above all. An experienced maker prevents a lot, because they’ve been through the errors before. But often it isn’t about objective defects at all. It’s a question of taste, of how it looks once it exists.”
That’s the realistic expectation to set. A first prototype takes two to five weeks depending on complexity, and more than one round is normal, not a sign something went wrong. A simple garment lands at the shorter end; a structured piece with complex construction takes longer.
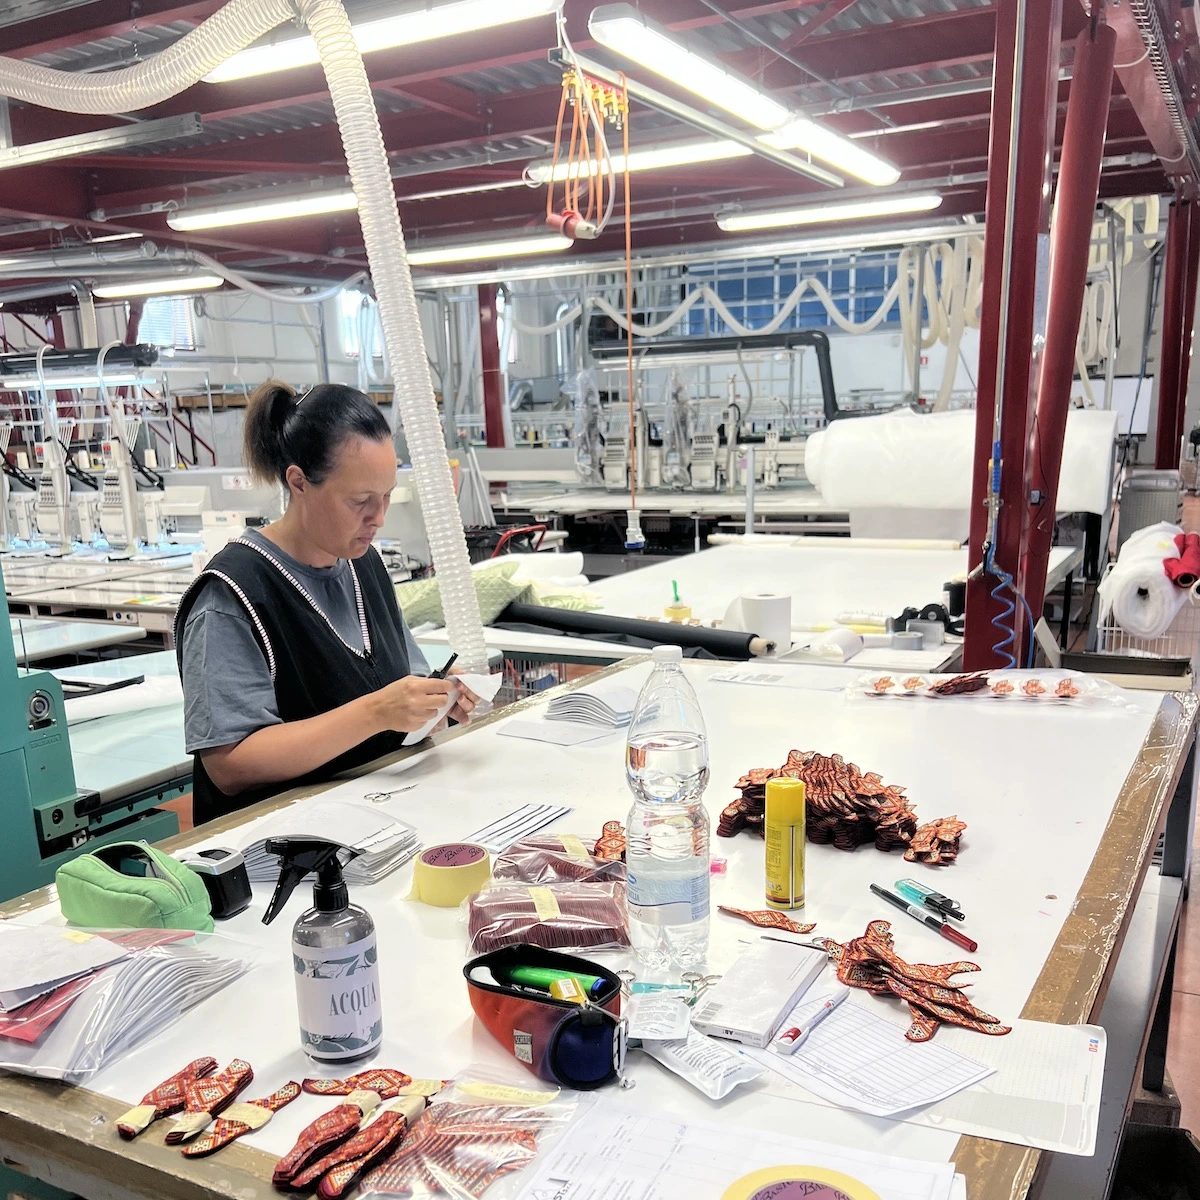
The deep dive covers what to expect and how to give feedback: the clothing prototype stage.
The sampling process
Once the prototype is right, sampling develops it across every size and colour you plan to sell. It’s the bridge between one approved piece and a production run, and it’s also the stage brands skip most often to save time, which is precisely the risk.
“Once the prototype is right, you move to sampling, where the product is developed across every size and colour. Skip that, and you carry the risk into production. If you’ve developed the product in all its variants, you can tell the manufacturer: perfect, now make it exactly like this. If you’ve only developed one size and one colour, and defects show up in production, you have far less to stand on.”
The timing here is more predictable than the prototype, with one condition attached. A sample takes about fifteen days once the fabric has arrived. That last part matters, and it’s the timeline trap we keep flagging: the clock starts when the material is in hand, not when you place the order.
Full detail here: the clothing sampling process.
Phase three: production and delivery
With an approved sample in every size and colour, production is the most straightforward phase to describe, because all the hard decisions were made before it started. What’s left is making the run well, checking it, and getting it to you.
Quality control
Quality control is the stage that catches problems before they reach your customer rather than after. On a production run, small deviations are normal, and the point of QC is to catch them while the workshop can still correct them.
How much scrutiny a run needs depends on the product and the standard. For premium goods it can mean inspecting every single piece, not a sample of the batch. Skipping or rushing this stage is a false economy, because a fault found in the workshop costs a correction, while the same fault found by a customer costs the relationship.
See the full guide: clothing quality control.
The production timeline
Production itself takes three to six weeks for most garments, depending on the quantity and the complexity of the make. That figure is reliable on its own. The trouble is that it’s only one part of the timeline, and rarely the part that causes delays.
The stage brands consistently underestimate is upstream of everything, and our production manager names it directly:
“One factor people overlook is the time to get materials. Not everything is in stock. Often you have to order the fabric or the trims, and that alone takes two to five weeks before anything can start.”
So the honest timeline isn’t just production. It’s materials, then prototyping, then sampling, then production, and each one has to finish before the next begins. Add them up and plan for the chain, not for a single number.
The full breakdown, stage by stage, is here: the clothing production timeline.
What production costs per unit
Production cost is the per-unit price of the finished run, and it moves with the model, the fabric, the make, and the quantity. The clearest lever is volume: the same garment usually costs less per piece at higher quantities, because setup and material costs spread across more units.
This is the number most brands mean when they ask what production costs, and it’s worth understanding properly before you commit to a run.
The detailed breakdown is here: the clothing manufacturing cost breakdown.
Why a sample costs more than a production piece
Here’s the number that surprises brands most. A prototype or sample usually costs two to three times the production unit price, not a fraction of it. If a shoe costs 150 euros to produce at volume, expect the prototype and sample to run 300 to 400 euros each.
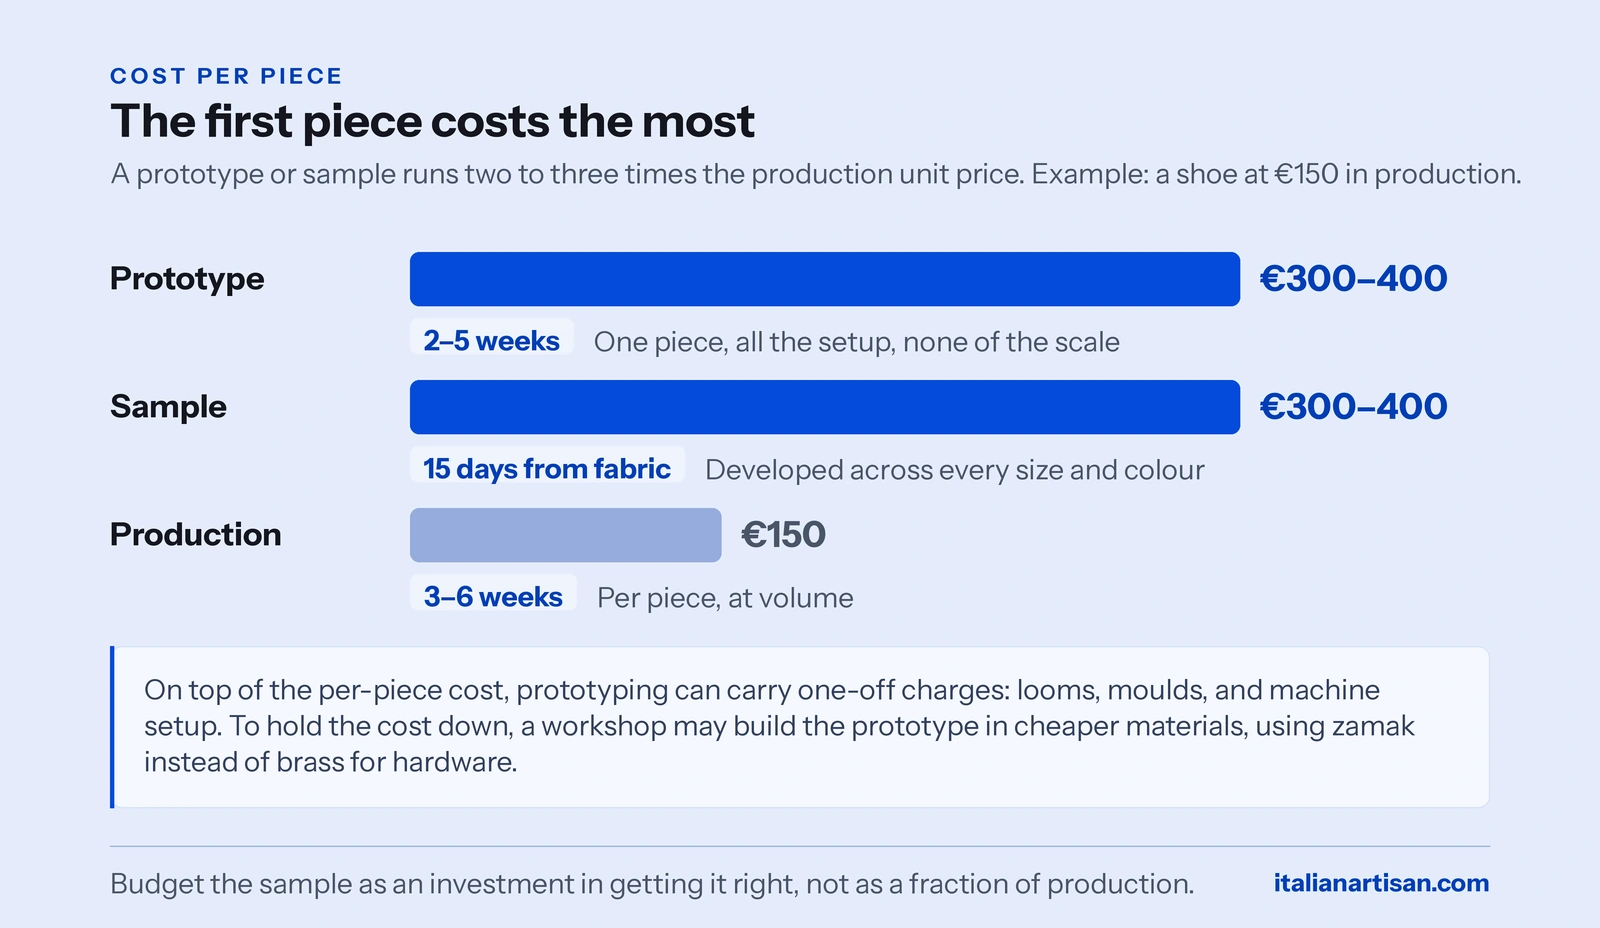
That feels backwards until you see why. A single prototype carries all the setup with none of the scale, and there are often one-off costs on top: looms, moulds, and machine setup that a full run would spread across hundreds of pieces. To keep the cost down, a workshop may even build the prototype in cheaper materials, using zamak alloy instead of brass for hardware, which is part of why a rough prototype can still cost less than the finished sample it leads to. The maker’s side of this is honest and worth hearing:
“When we take on a new brand, I invest in it. The five or ten sample pairs aren’t where I make money. I put in fifty years of experience, my time, and my care, because that’s what gets the product right.”
So a sample isn’t a small version of a production cost. It’s a separate investment in getting the product right, and budgeting for it properly is part of planning a collection.
Full detail here: what a clothing sample costs.
Where the process goes wrong
Almost every expensive mistake in manufacturing traces back to the same root: treating the stages as separate, when they’re a chain. A decision skipped or rushed early doesn’t stay early. It surfaces later, where it costs more to fix.
The patterns repeat across brands.
- Skipping the sample stage. Approving one prototype and jumping to production, then discovering the problems across sizes and colours when the full run is already made.
- Planning for production time only. Building a launch date around the three-to-six-week production window, and forgetting the weeks of materials, prototyping, and sampling that come first.
- Budgeting the sample as a fraction of production. Then discovering that the prototype costs more than a production unit, not less.
- A weak size chart. Receiving a garment that’s beautifully made and fits nobody in particular, because the brand borrowed the measurements instead of building them.
- Changing direction mid-process. Reworking decisions after the workshop has started, which turns a clean sequence into an expensive loop.
The common thread is visibility. A brand that can see the whole chain plans for it. A brand that sees only the next step keeps hitting surprises at the one after. That’s the entire argument for understanding the process before you’re in the middle of it.
Running the whole process with one partner
Read end to end, the process makes one thing clear: the hard part isn’t any single stage. It’s that the stages have to connect. Fabric feeds the pattern, the pattern feeds the prototype, the prototype feeds the sample, and a weak handover at any point shows up downstream.
That’s the case for having one partner hold the whole chain rather than stitching it together yourself across separate suppliers. When the same team sources the fabric, develops the pattern, runs the prototype and sample, and manages production and quality control, the handovers stop being where things break.
A partner who runs this weekly also heads off the timeline traps instead of discovering them with you. Someone who runs this process every week orders the materials early, sets realistic expectations on prototype rounds, and plans the sequence as a whole, so the surprises we’ve described throughout this guide mostly don’t happen to you.
Italian Artisan works exactly this way: one project manager, one accountable chain, from fabric to finished garment.
Run your whole production with one team
Tell us what you’re making and where you are in the process. We’ll map the stages for your product, with realistic timelines and costs, and manage the chain from fabric to delivery.
- One accountable chain — fabric, pattern, prototype, sample, production, and quality control
- Realistic timelines — planned as a sequence, with materials ordered early, not as a single number
- Verified Italian workshops — matched to your product, whether it’s clothing, knitwear, bags, or shoes
Frequently asked questions
What are the stages of the clothing manufacturing process?
In order: fabric sourcing, pattern making and size grading, building the size chart, prototyping, sampling across sizes and colours, production, and quality control before shipping. Each stage produces something the next one needs, so the sequence matters as much as the individual steps.
How long does the clothing manufacturing process take?
The core stages are a prototype in two to five weeks, a sample about fifteen days after fabric arrives, and production in three to six weeks. But you also have to add the time to order materials, which can be two to five weeks on its own. The realistic total is the whole chain added up, not the production window alone.
Why does a prototype cost more than a production piece?
Because a single prototype carries all the setup with none of the scale. A prototype or sample typically costs two to three times the production unit price, plus any one-off costs like looms, moulds, and machine setup. If a shoe costs 150 euros to produce at volume, the prototype might run 300 to 400 euros.
Can I skip the sampling stage to save time?
You can, but it moves risk into production, where it’s most expensive. Developing the product across every size and colour first means you can tell the manufacturer to reproduce it exactly. If you’ve only made one size and one colour and defects appear in the full run, you have far less to fall back on.
What causes delays in clothing production?
The most common cause is a stage nobody planned for, usually materials. Not everything is in stock, and ordering fabric or trims can take weeks before production starts. The other frequent cause is changing decisions mid-process, which turns a clean sequence into an expensive loop.
Do I need to manage each stage myself?
No. You can run the stages across separate suppliers, or have one partner manage the whole chain, from fabric to finished garment. With a single partner, the handovers between stages, where most problems start, stay inside one accountable team.